MS WORD 2003


 Choose the Save button
  on the Standard Toolbar.

Choose Save As to rename a document. Be careful not to overwrite your original file.
 You can Copy information from many different sources including Websites, Emails, and other Office applications like Excel and PowerPoint.

To Drag and Drop Selected Text:
Identifying Parts of the Word Window
Introduction
Microsoft Word 2003 is the word processing application in the Microsoft Office Suite. Create professional-looking, formatted text documents with this powerful Word processing software.By the end of this lesson, learners should be able to:
- Identify the parts of the Word 2003 Window
- Change the document view
- Operate the drop-down menus
- Identify the Task Pane
The Basics of the Word Window
Let's briefly review the basic parts of the Word 2003 window before we move onto word processing.
Shown below is the Microsoft Word default window. When Word is launched, a new blank document, or default window, opens in Print Layout view. Although window elements are fully explained in our Windows course, here is a brief explanation of the Word window.
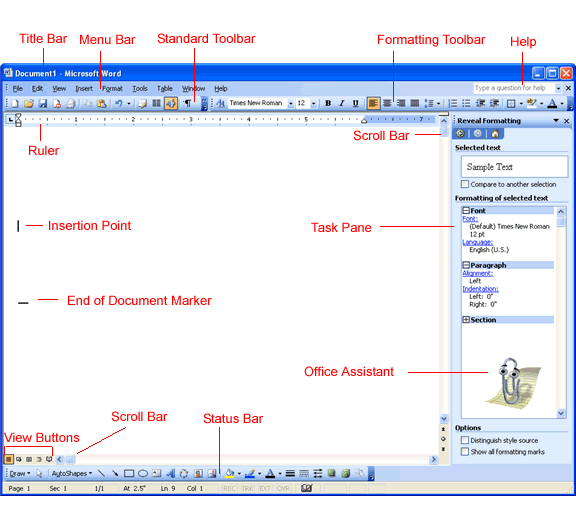
Title Bar
Displays the document name followed by a program name.
Menu Bar
Contains a list of options to manage and customize documents.
Standard Toolbar
Contains shortcut buttons for the most popular commands.
Formatting Toolbar
Contains buttons used for formatting.
Ruler
Used to set margins, indents, and tabs.
Insertion Point
The location where the next character appears.
End-of-Document Marker
Indicates the end of the document.
Help
Provides quick access to Help topics.
Scroll bars
Used to view parts of the document.
Status Bar
Displays position of the insertion point and working mode buttons.
Task Pane
Provides easy access to commonly used menus, buttons and tools.
View Buttons
Changes the layout view of the document to Normal View, Web Layout View, Reading Layout View, Print Layout View, or Outline View.
Office Assistant
Links to the Microsoft Office Help feature.
Change in View
In an effort to provide various ways in which to view your work in progress and remain organized, Word 2003 offers six different views for your document. The six views are Normal View, Web Layout View, Reading Layout View, Print Layout View, Outline View, and Full Screen View.
Normal view is best used for typing, editing, formatting and proofreading. It provides a maximum amount of space without rulers or page numbers cluttering your view.
Web Layout view shows you what your text will look like on a web page.
Reading Layout view is best for documents that you do not need to edit. The goal of this view is to increase legibility so that the user can read the document easily.
Print Layout view shows you what your document will look like when it is printed. Under Print Layout view you can see all elements of the page. Print Preview shows you this as well.
Outline view is used to create and edit outlines. Outline view only shows the headings in a document. This view is particularly handy when making notes.
Full Screen view displays ONLY the document that you are working on. All the other pieces of the Word window are removed except for one button that allows you to Close View Screen.
Changing your Document View:
- Click View on the menu bar.
- Select the view of your choice.
OR - Click one of the five buttons at the bottom left of your Word window
(View Full Screen is not available in this location).


Pull-Down Menus
Each Office 2003 program features a menu bar. The menu bar is made up of many different menus. Each menu contains commands that enable you to work within the program.
If you have used a previous version of Microsoft Word, you may notice the menu bar in Word 2003 operates a little differently than before.
Word 2003 uses pull-down menus that initially display commands that users most often need.
If you have used a previous version of Microsoft Word, you may notice the menu bar in Word 2003 operates a little differently than before.
Word 2003 uses pull-down menus that initially display commands that users most often need.
Operating the new Pull-Down Menus
To Open a Menu:
- Click on a menu name on the menu bar.
- View the commands listed under the pull-down menu.
- With the menu open, drag the mouse pointer to a command and click on it to select the command. (As you drag your mouse pointer over the commands, each command is highlighted in blue.)
- If there is a small black triangle next to a command, hover the mouse pointer over the command with the triangle and a cascading menu with additional options will appear. Point and click to make a selection from the cascading menu.
- Commands that are not used often in 2003 are initially hidden from the viewer. If you do not see all the commands on a menu, click on the double arrows at the bottom of the pull-down menu. You can also double-click the menu to expand it.


Using the Task Pane
When opened, the task pane will appear on the right side of the Word window. The task pane provides easy access to commonly used menus, buttons and tools. By default, the Task Pane will appear when Word 2003 is first launched.
If you do not see your task pane, you can view it by either selecting certain commands or by manually opening it.
To Open the Task Pane:
If you do not see your task pane, you can view it by either selecting certain commands or by manually opening it.
To Open the Task Pane:
- Click on View in the menu bar.
- Select Task Pane.

Along the top bar of the task pane you should see small backwards and forwards buttons on the left as well as a down arrow on the right. To view different task panes available to you, click on the down arrow. Once you have opened different task panes, you can navigate through them by clicking on the left and right arrow button on the left. To close your task pane, click the x symbol on the far right of the bar.
Challenge!
- Download and save the Personal Letter Word document to complete challenges 1 through 6. Need help? How to Download a file.
- After opening the document, change the view to Normal View.
- Practice using the pull-down menus on the menu bar.
- Find the Task Pane and become familiar with it.
- Type today's date at the beginning of the document.
- Save the document by selecting File >> Save from the main menu.
- Close the document.
Save and Save As
Introduction
By the end of this lesson, learners should be able to:
- Use Save
- Use Save As
Saving a New File
When Saving a File for the First Time:
- Click File on the Menu Bar.
- Select Save - Ctrl+S.

Using the Standard Toolbar to Save:
on the Standard Toolbar.Save As Dialog Box
After selecting Save from the Menu Bar or the Standard Toolbar, the Save As Dialog Box appears.
To Specify a File Location:
- Open the Save In: drop down list box.
- Choose 31/2 floppy (A:) if saving to a floppy disk.
- Choose (C:) if saving to your hard disk.
- Name your file in the File name: box.
- Click Save.
If you do not choose a file name, Microsoft Word will assign a file name for you. It assigns the first line of text in you document, unless you give it a different name when prompted in the File name box.
If you do not specify a file location, Office uses the My Documents folder as the default location. So, if you can't find a file, check My Documents.
After Naming and Saving a File Once:
- Click the Save button
OR
- Go to the File menu and choose Save.
You will not get a Save As dialog box again.
Saving a File Under a New Name
If you wish to create an exact copy of an original document for editing or revising purposes, you should perform a Save As on the file and save it under a new name. This will guarantee that you always have a saved, original copy.
Follow these steps to perform a Save As:
Follow these steps to perform a Save As:
- Click File from the menu bar.
- Select Save As. The Save As Dialog Box appears.
- Type a new name for your file in the File name: box.
- Click Save.
Choose Save As to rename a document. Be careful not to overwrite your original file.Did you Know?
Save periodically when you are working in an application. Losing information is never fun! You can quickly save by using the quick-key combination Ctrl + S.
If Word encounters a problem, it may automatically shut down without giving you the chance to Save. The Document Recovery Task Pane will appear the next time you open Word. This pane allows you to view files that were recovered when Word discontinued working properly. Select the best version of your document and make sure to save it.
If Word encounters a problem, it may automatically shut down without giving you the chance to Save. The Document Recovery Task Pane will appear the next time you open Word. This pane allows you to view files that were recovered when Word discontinued working properly. Select the best version of your document and make sure to save it.
Cut, Copy, Paste and Drag and Drop
Introduction
By the end of this lesson, learners should be able to:
- Cut, copy and paste
- Drag and drop
Cut, Copy, Paste
Often in word processing, you will need to transfer information from one document to another. Instead of having to re-type or replace this information, Word allows you to move a block of text (a word, sentence, paragraph, page, document, or graphic). Cut, Copy and Paste are extremely time-saving features. The Cut, Copy and Paste buttons are located on the Standard toolbar.
Cut and Paste:
- The Cut feature allows you to remove selected text from the document and temporarily place it on the Office Clipboard.
- The Clipboard is a temporary storage file in your computer's memory. Items placed on the Clipboard will remain there until you exit Word.
- The Paste feature allows you to get text from the Clipboard and place it in the same or even another document.
Copy and Paste:
- The Copy feature allows you to copy selected text from the document and temporarily place it on the Clipboard.
- The Clipboard is a temporary storage file in your computer's memory.
- The Clipboard can hold up to twenty-four items. Once you copy the 25th item, the first copied item is deleted.
- The Paste feature allows you to select any of the collected items on the Clipboard place it in the same or even another document.
You can Copy information from many different sources including Websites, Emails, and other Office applications like Excel and PowerPoint.Working with Blocks of Text
To Cut and Paste a Block of Text:
- Select the text you want to move.
- Click the Cut button on the Standard Toolbar.
- Place the insertion point where you want the text inserted.
- Click the Paste button.


To Copy and Paste a Block of Text:
- Select the text you want to move.
- Click the Copy button on the Standard Toolbar.
- Place the insertion point where you want the text inserted.
- Click the Paste button.
- Once the item has been pasted, you can determine the formatting by clicking on the Paste Options button that appears just below your pasted selection. Check or de-select any of the following options:
- Keep Source Formatting - maintains the text formatting of the original document.
- Match Destination Formatting - formats the pasted text to match the text formatting in the document in which it was pasted.
- Keep Text Only - removes any graphics that you may have copied along with the copied text.
- Apply Style or Formatting - allows you to choose a specific format from the Styles and Formatting menu.

Viewing the Clipboard items:
- Click Edit on the Menu Bar.
- Select Office Clipboard.
- The Clipboard will appear on the right side of the Word window in the Task Pane.
- The Clipboard will display any of the 24 items you have copied.
Menu Commands:
- Edit
cut
- Edit
- Edit
Keyboard Shortcuts:
- Ctrl+C = copy
- Ctrl+X = cut
- Ctrl+V = paste
Become comfortable using the keyboard shortcuts to increase your speed in word processing.
If you cut, copy, or paste something you didn't mean to, use the Undo button or choose not to save changes to your document when you close your document.
If you cut, copy, or paste something you didn't mean to, use the Undo button or choose not to save changes to your document when you close your document.
Drag and Drop
The drag and drop method of moving text allows you to move selected text using your mouse.
This method is convenient for moving text when:
- Moving text from one location to another within a document.
- Moving text to another document.
To Drag and Drop Selected Text:
Drag:
- Select the text you wish to move.
- Place the mouse pointer anywhere on the selected text without clicking.
- Click and hold the right mouse button until the insertion point changes into a white arrow pointing up to the left.
- Right click and drag the selected text to the new location.
Drop:
- During this process, the mouse pointer changes to a box with a small white arrow over it, indicating you are dragging text.
- When you reach the new location, release the mouse button to drop the text into place.
- Once you release the mouse button a menu list will appear that offers you the following options:
- Move Here
- Copy Here
- Link Here
- Create Hyperlink Here
- Cancel
(Be sure to remove the selection highlight before pressing any key, so that you do not delete your newly moved text. If you do accidentally delete, simply press the Undo button).
Challenge!
- Download and save the Personal Letter Word document to complete challenges 1 through 6. Need help? How to Download a file.
- Open the personal letter document.
- Use the Drag and Drop feature to move the first sentence of the letter (“My daughter just got…”) to the end of the final paragraph of the letter.
- Use the mouse to select the paragraph you wrote (3rd paragraph).
- Use the Copy, Paste, and Cut features to move the 3rd paragraph so it is the second paragraph of the letter.
- Save and close the document.
No comments:
Post a Comment